Saturday, April 15, 2023

Building a Skillion or Lean-to Roof: Framing Plan

Skillion or Lean-to Roof

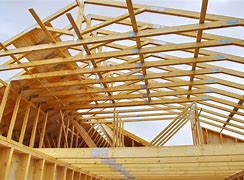
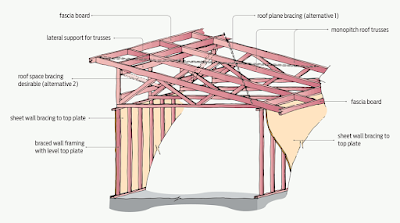
If you're considering building a skillion or lean-to roof for your shed, porch, or other structure, having a solid framing plan is essential. A framing plan serves as a blueprint that outlines the structure and design of the roof, providing guidance on how to properly construct the framework for a stable and durable roof. In this article, we'll explore the key components of a framing plan for a skillion or lean-to roof, including the materials, measurements, and steps involved in building a structurally sound roof.

Materials and Tools

Before you start framing your skillion or lean-to roof, it's important to gather all the necessary materials and tools. You'll need the following items:
  • Lumber: Depending on the size and design of your roof, you'll need various lengths and sizes of lumber for the framing components, such as rafters, purlins, and ridge beams. Be sure to use pressure-treated or rot-resistant lumber for durability and longevity.
  • Roofing material: Choose the appropriate roofing material for your skillion or lean-to roof, such as metal panels, shingles, or corrugated sheets.
  • Fasteners: Use nails, screws, and brackets to securely attach the framing components together.
  • Measuring tools: Have a tape measure, level, and square on hand for accurate measurements and alignments.
  • Circular saw or hand saw: You'll need a saw to cut the lumber to the correct lengths and angles.
  • Safety gear: Always wear appropriate safety gear, including gloves, goggles, and a hard hat, when working with power tools and construction materials.

Measurements and Layout

Precise measurements and layout are crucial for a well-constructed skillion or lean-to roof. Here are the key measurements and layout considerations to keep in mind:
  • Roof slope: Decide on the desired slope for your roof, which will affect the angle of the rafters. A typical slope for a skillion or lean-to roof is 1:12, meaning the roof rises 1 inch for every 12 inches of horizontal run.
  • Rafter spacing: Determine the spacing between rafters, which will depend on the size of the roof and the type of roofing material being used. Typically, rafters are spaced 16 inches or 24 inches apart on center.
  • Overhang: Decide on the desired overhang for your roof, which is the distance that the rafters extend beyond the walls of the structure. The overhang provides protection from the elements and adds aesthetic appeal to the roof.
  • Ridge beam: If your skillion or lean-to roof has a ridge, calculate the length and size of the ridge beam, which is the horizontal beam that runs along the top of the roof and supports the rafters.
  • Purlins: Purlins are horizontal beams that run perpendicular to the rafters and support the roofing material. Determine the spacing and size of the purlins based on the type of roofing material being used.

Steps for Framing a Skillion or Lean-to Roof

Once you have gathered the materials, measured and laid out the roof design, you can begin the framing process. Here are the general steps for framing a skillion or lean-to roof:
  1. Prepare the site: Clear the area where the roof will be constructed, making sure it is level and free from debris. If necessary, install any necessary roof sheathing or decking on the existing structure to provide a solid base for the roof.
  2. Install the ridge beam: If your skillion or lean-to roof includes a ridge, install the ridge beam along the top of the roof, making sure it is level and securely attached to the existing structure. Use appropriate fasteners, such as nails or screws, to secure the ridge beam in place.
  3. Attach the rafters: Install the rafters at the desired spacing, securing them to the ridge beam and the existing structure using appropriate fasteners. Make sure the rafters are plumb and level, and that they are evenly spaced according to your layout plan. If necessary, use a level and square to ensure accurate alignments.
  4. Install the purlins: If your skillion or lean-to roof includes purlins, install them perpendicular to the rafters, using appropriate fasteners. The spacing and size of the purlins will depend on the type of roofing material being used, so refer to your layout plan for guidance.
  5. Attach the roofing material: Once the framing is complete, you can install the roofing material of your choice. Follow the manufacturer's instructions for installation, ensuring that the material is properly secured to the purlins or directly to the rafters, depending on the type of roofing material being used.
  6. Install any additional features: Depending on your specific design, you may need to install additional features such as fascia, soffit, or trim to complete the roof. Follow the manufacturer's instructions and your design plan for proper installation.
  7. Finish the roof: Once all the framing and roofing materials are in place, carefully inspect the roof for any gaps, loose fasteners, or other potential issues. Make any necessary adjustments or repairs to ensure a tight and durable roof.
Conclusion

Building a skillion or lean-to roof can be a rewarding DIY project, but it requires careful planning and precise execution to ensure a structurally sound and aesthetically pleasing result. By following a framing plan that includes accurate measurements, proper layout, and careful installation of materials, you can create a functional and attractive roof for your shed, porch, or other structure. Remember to always prioritize safety, use appropriate materials and tools, and consult with a professional if you are unsure about any aspect of the construction process. With the right approach, you can confidently build a single slope shed roof that will provide years of reliable performance.

Friday, April 14, 2023

How to Attach a Lean-To Roof to an Existing Roof

How to Attach a Lean-To Roof to an Existing Roof

If you have an existing building or shed with a sloped roof, you may want to add a lean-to roof to provide additional space for storage or other purposes. Attaching a lean-to roof to an existing roof requires careful planning and proper installation to ensure a secure and watertight connection. Here are the steps to attach a lean-to roof to an existing roof:

Step 1: Plan and Measure

Before you start, plan out the design and dimensions of your lean-to roof. Measure the height, width, and length of the existing roof and determine the desired slope and size of the lean-to roof. Consider factors such as the location of doors, windows, and gutters on the existing roof, as well as local building codes and regulations. Create a detailed plan and obtain any necessary permits or approvals from local authorities.

Step 2: Gather Materials and Tools

Next, gather all the materials and tools you will need for the project. This may include lumber for the rafters and framing, roofing materials, fasteners, flashing, and waterproofing sealants. Make sure you have the right tools for the job, such as a saw, drill, level, tape measure, and safety gear.

Step 3: Prepare the Existing Roof

Before attaching the lean-to roof, you need to prepare the existing roof. Clean the area where the lean-to roof will connect to the existing roof, removing any debris, dirt, or old roofing materials. Inspect the existing roof for any damage or leaks and repair them as needed. Install a layer of waterproofing underlayment or flashing along the connection point to ensure a watertight seal.

Step 4: Install the Rafters and Framing

Next, install the rafters and framing for the lean-to roof. Use the measurements and design from your plan to cut the rafters to the desired length and angle to match the slope of the existing roof. Attach the rafters to the existing roof using metal brackets or framing connectors, following the manufacturer's instructions and local building codes. Make sure the rafters are level and securely fastened to the existing roof.

Step 5: Install the Roofing Material

Once the rafters and framing are in place, you can install the roofing material for the lean-to roof. Follow the manufacturer's instructions for the specific roofing material you are using, but in general, start from the bottom edge and work your way up, overlapping each row to ensure proper water shedding. Secure the roofing material with roofing nails or screws, following the recommended spacing and pattern. Make sure the roofing material is properly aligned and trimmed to fit around any openings or obstacles.

Step 6: Finish and Clean Up

Finally, finish up by installing any additional trim or accessories, such as fascia boards, gutters, or vents, according to your design and functional needs. Make sure all fasteners are properly secured and trim is aligned and level. Clean up the worksite by removing any debris, nails, or tools to ensure a safe and tidy finish.

Conclusion

Attaching a lean-to roof to an existing roof can provide additional space and functionality to your building or shed. However, it requires careful planning, precise measurements, and proper installation to ensure a secure and watertight connection. Follow the steps above, along with local building codes and manufacturer's instructions, to successfully attach a lean-to roof to an existing roof. With proper planning, preparation, and installation, you can create a functional and aesthetically pleasing lean-to roof that seamlessly integrates with your existing structure.

Summary

Attaching a lean-to roof to an existing roof requires careful planning, precise measurements, and proper installation. Follow these steps:

  1. Plan and measure the design and dimensions of the lean-to roof.
  2. Gather all materials and tools needed for the project.
  3. Prepare the existing roof by cleaning the area and installing waterproofing underlayment or flashing.
  4. Install the rafters and framing, ensuring they are level and securely fastened to the existing roof.
  5. Install the roofing material, following the manufacturer's instructions and overlapping rows for proper water shedding.
  6. Finish up by installing any additional trim or accessories, and clean up the worksite.

By following these steps, along with local building codes and regulations, you can successfully attach a lean-to roof to an existing roof and create a functional and attractive addition to your building or shed.

Remember to always prioritize safety and take necessary precautions throughout the entire process. If you are unsure about any step or aspect of the project, consult with a professional or seek assistance from an experienced woodworker. With proper planning and execution, you can achieve a successful outcome and enjoy the benefits of a well-attached lean-to roof for years to come.

Thursday, April 13, 2023

How to Build a Single Slope Shed Roof

How to Build a Single Slope Shed Roof

As a woodworker, building a shed can be a rewarding and practical DIY project. One of the key elements in constructing a shed is the roof, which not only provides protection against the elements but also adds to the overall aesthetic appeal of the structure. In this article, we will focus on building a single slope shed roof, also known as a monoslope or lean-to roof. This type of roof is characterized by its simplicity and modern design, making it a popular choice for sheds, carports, and other small structures.

Materials and Tools

Before you begin building your single slope shed roof, you will need to gather the following materials and tools:

Materials:

  • Roofing materials (such as shingles, metal sheets, or corrugated panels)
  • Lumber (such as pressure-treated or cedar boards)
  • Nails, screws, and other fasteners
  • Roofing felt or underlayment
  • Drip edge

Tools:

  • Measuring tape
  • Pencil or marker
  • Circular saw or handsaw
  • Hammer or nail gun
  • Screwdriver or drill
  • Level
  • Roofing nailer or stapler

Step 1: Prepare the Shed Walls

The first step in building a single slope shed roof is to prepare the walls of the shed. Measure and mark the desired height of the roof slope on one of the walls. This will determine the pitch of the roof, which can vary depending on your preference and the local building codes. Use a level to ensure the mark is level and transfer it to the other wall, creating a straight line across the walls.

Step 2: Install the Roof Framing

Next, you will need to install the roof framing. Cut the roof rafters to the desired length, allowing for overhangs if desired, and attach them to the shed walls along the marked line. Make sure the rafters are spaced evenly and securely attached to the walls with nails or screws.

Step 3: Install the Roof Sheathing

Once the roof framing is in place, you can install the roof sheathing. Cut the plywood or other sheathing material to fit between the rafters and attach it to the rafters with nails or screws. Leave a small gap between the sheathing panels for expansion and contraction, as recommended by the manufacturer.

Step 4: Install the Roofing Underlayment

Before installing the roofing materials, it is important to install a roofing underlayment to provide an additional layer of protection against water infiltration. Roll out the roofing felt or underlayment over the sheathing, starting from the bottom edge and overlapping the edges by a few inches. Secure the underlayment with roofing nails or staples.

Step 5: Install the Drip Edge

Next, install a drip edge along the bottom edge of the roof to prevent water from seeping under the roofing materials. Nail or staple the drip edge to the roof sheathing, making sure it overhangs the edge of the sheathing slightly to direct water away from the shed walls.

Step 6: Install the Roofing Material

Now it's time to install the actual roofing material. Depending on your preference and budget, you can choose from various options such as shingles, metal sheets, or corrugated panels. Follow the manufacturer's instructions for the specific material you are using, but in general, start from the bottom edge and work your way up, overlapping each row to ensure proper water shedding. Secure the roofing material with roofing nails or screws, following the recommended spacing and pattern.

Step 7: Finish and Clean Up

Once the roofing material is installed, you can finish up by installing any additional trim or accessories, such as ridge caps, fascia boards, or vents, according to your design and functional needs. Make sure all fasteners are properly secured and trim is aligned and level. Finally, clean up the worksite by removing any debris, nails, or tools to ensure a safe and tidy finish.

Conclusion

Building a single slope shed roof may seem intimidating, but with the right materials, tools, and instructions, it can be a manageable DIY project for any woodworker. Remember to carefully plan and measure, follow local building codes and manufacturer's instructions, and prioritize safety throughout the construction process. With some patience and effort, you can create a functional and stylish shed roof that will protect your belongings for years to come.

Wednesday, April 12, 2023

How to Build Rafters for a Lean To Shed

How to Build Rafters for a Lean To Shed

Building a lean-to shed can provide you with extra storage space for your tools, equipment, or other belongings. One crucial component of constructing a lean-to shed is building the rafters, which are the horizontal beams that support the roof. Here's a step-by-step guide on how to build rafters for a lean-to shed.

Step 1: Gather Materials and Tools

Before you start building the rafters, make sure you have all the necessary materials and tools ready. You will need pressure-treated lumber for the rafters, a circular saw, a framing square, a tape measure, a hammer, nails, and a level.

Step 2: Determine Rafter Length and Angle

Measure the distance from the top of the wall where the rafters will attach to the outside edge of the shed. This measurement will be the length of your rafters. Next, decide on the pitch or angle of the roof. Common pitches for lean-to sheds are 1:4 or 1:6, which means the roof will rise 1 inch for every 4 or 6 inches of run. Use a framing square to mark the angle on the rafter board.

Step 3: Cut Rafters

Using a circular saw, carefully cut the rafters along the angle you marked, making sure the cuts are accurate and clean. You will need two identical rafters for each side of the shed.

Step 4: Attach Rafters to Wall

Position one of the rafters on the top of the wall, flush with the outside edge. Use a level to make sure it is plumb, and then nail it to the wall with framing nails. Repeat the process with the second rafter on the opposite side of the wall, making sure it is level and aligned with the first rafter.

Step 5: Install Rafter Brace

Cut a piece of pressure-treated lumber to the same length as the rafters, and attach it between the two rafters at the top, forming a triangle shape. This will provide additional support for the rafters and help distribute the weight of the roof evenly.

Step 6: Add Additional Rafters

Depending on the length of your shed, you may need to add additional rafters for support. Space them evenly along the length of the shed, ensuring they are level and plumb before nailing them in place.

Step 7: Install Roof Sheathing

Once all the rafters are in place, you can install the roof sheathing. Use plywood or oriented strand board (OSB) to cover the rafters, leaving a 1/8-inch gap between each sheet for expansion. Nail the sheathing to the rafters using galvanized nails, making sure it is secured tightly.

Step 8: Install Roofing Material

Finally, you can install the roofing material of your choice, such as shingles or metal roofing, following the manufacturer's instructions.

Conclusion

Building rafters for a lean-to shed is a critical step in constructing a sturdy and durable shed. By following these steps and using the right materials and tools, you can successfully build rafters that will support the roof of your lean-to shed and provide you with a functional and reliable storage space.

Tuesday, April 11, 2023

Download Lean-to Shed Plans


Plans for Lean-to Shed

As a woodworker, I know the importance of having a well-designed and functional shed in your backyard. A lean-to shed is a popular choice for homeowners who are looking for a simple and cost-effective way to add extra storage space to their property. Lean-to sheds are typically attached to an existing wall or structure, making them a practical solution for storing tools, equipment, or other belongings. In this article, I will share some authentic and friendly plans for building a lean-to shed that will not only enhance the aesthetics of your backyard but also provide you with a functional storage space.

Planning Your Lean-to Shed

Before you start building your lean-to shed, it's important to carefully plan the design and layout to ensure that it meets your specific needs. Here are some key factors to consider:

  • Location: Choose a suitable location for your lean-to shed that is close to the area where you need storage. It should also have proper drainage to prevent water damage to your belongings.
  • Size: Determine the size of your lean-to shed based on the items you plan to store and the available space in your backyard. Measure the length, width, and height carefully to ensure that your shed will fit perfectly.
  • Materials: Select high-quality materials that are durable and weather-resistant. Common materials for lean-to sheds include wood, metal, and vinyl. Choose materials that will complement the style of your home and backyard.
  • Design: Decide on the design of your lean-to shed based on your preferences and the overall aesthetics of your property. You can choose from various styles, such as traditional, modern, or rustic, and add features like windows, doors, and vents to enhance the functionality of your shed.
  • Permits: Check with your local building department to see if you need any permits or approvals before you start construction. It's important to comply with local building codes and regulations to ensure that your shed is safe and legal.

Building Your Lean-to Shed

Once you have planned your lean-to shed, it's time to start building! Follow these step-by-step instructions to construct your shed:

Step 1: Prepare the Site

Clean the area where you will be building your lean-to shed. Remove any debris, rocks, or vegetation, and level the ground using a shovel or a rake. Mark the outline of your shed using stakes and string to ensure that it will be square and level.

Step 2: Build the Foundation

Depending on the materials you have chosen, you can build the foundation for your lean-to shed using concrete blocks, gravel, or pressure-treated lumber. Follow the manufacturer's instructions for your chosen foundation type and make sure it is level and secure.

Step 3: Construct the Frame

Using the measurements and design you have chosen, cut the lumber for the frame of your lean-to shed. Assemble the frame on the foundation, making sure it is square and level. Use screws or nails to attach the pieces securely.

Plans for Lean-to Shed

Step 4: Install the Roof

Once the frame is in place, it's time to install the roof. Measure and cut the roof panels according to the dimensions of your shed, and secure them to the frame using nails or screws. Make sure the roof panels are properly aligned and level to ensure proper drainage and prevent water damage.

Step 5: Add Doors and Windows

If you want to include doors and windows in your lean-to shed, now is the time to install them. Measure and cut the openings for the doors and windows in the frame, and install them according to the manufacturer's instructions. Make sure they are properly sealed to prevent drafts and water infiltration.

Step 6: Finish the Interior and Exterior

Once the structure of your lean-to shed is complete, you can finish the interior and exterior to your liking. You can add shelves, hooks, or other storage solutions inside the shed to keep your belongings organized. For the exterior, you can paint or stain the shed to protect it from the elements and enhance its appearance. Choose colors that complement the style of your home and backyard.

Lean-to Shed

Free Plans for Lean-to Shed

Tips for Building a Lean-to Shed

As a woodworker, I have learned some valuable tips that can help you successfully build a lean-to shed:

  • Use pressure-treated lumber for the foundation and frame to ensure durability and prevent rotting.
  • Check the local building codes and regulations before starting construction to ensure compliance.
  • Double-check your measurements and make precise cuts to ensure a snug fit and professional-looking finish.
  • Invest in quality materials and tools to ensure a sturdy and long-lasting shed.
  • Follow the manufacturer's instructions for installation of doors, windows, and other components to ensure proper functioning.
  • Take your time and work carefully, especially when it comes to aligning and leveling the shed to ensure a professional result.
Plans for Lean-to Shed pdf

Buy Plans for Lean-to Shed Kit

Conclusion plans for lean to shed

Building a lean-to shed can be a rewarding woodworking project that provides you with additional storage space and enhances the aesthetics of your backyard. By carefully planning the design, choosing quality materials, and following proper construction techniques, you can create a functional and visually appealing lean-to shed that will serve you for years to come. Don't forget to check local regulations and obtain any necessary permits before starting your project. Happy woodworking!


Get Plans for Lean-to Shed

Plans for Lean to Shed free

Sunday, April 9, 2023

Choose Green Lumber Lean-To Shed

Choose Green Lumber lean to shed

Welcome to this step-by-step guide on building your own lean-to shed using green lumber! If you're a woodworker looking to create a functional and affordable storage solution for your backyard, a lean-to shed is a great option. With its simple design and minimalistic construction, a lean-to shed is perfect for storing tools, equipment, and other items while saving space and money.

Why Choose Green Lumber?

Before we dive into the steps for building a lean-to shed, let's talk about why you might consider using green lumber. Green lumber refers to wood that has been freshly cut from a living tree and has not undergone any drying or seasoning process. While seasoned or kiln-dried lumber is typically recommended for woodworking projects, there are some advantages to using green lumber for a lean-to shed:

  • Cost-effective: Green lumber is often cheaper than seasoned lumber, making it a budget-friendly option for building a shed.
  • Readily available: Green lumber is widely available at most lumberyards and home improvement stores, making it easily accessible for your DIY project.
  • Easy to work with: Green lumber is softer and more pliable compared to seasoned lumber, making it easier to cut, drill, and fasten.
  • Natural beauty: Green lumber has a fresh, natural look with its vibrant color and grain pattern, which can add character and charm to your shed.

While using green lumber has its benefits, it's important to keep in mind that it may require some additional considerations during construction, such as allowing for shrinkage and warping as the wood dries over time. However, with proper techniques and planning, you can successfully build a lean-to shed using green lumber that will stand the test of time.

Materials and Tools

Before you start building your lean-to shed, gather the following materials and tools:

Materials:

  • Green lumber for framing (such as pressure-treated pine or cedar) in the appropriate dimensions for your shed
  • Plywood sheets for walls and roof
  • Roofing shingles
  • Nails or screws
  • Door and window hardware (if desired)

Tools:

  • Measuring tape
  • Circular saw or miter saw
  • Hammer or drill
  • Level
  • Square
  • Chisel (if notching lumber)
  • Paint or stain (optional)

Step 1: Prepare the Site

The first step in building your lean-to shed is to prepare the site where the shed will be located. Here's how you can do it:

  1. Choose a suitable location for your shed, taking into consideration factors such as the slope of the ground, proximity to existing structures, and local building codes.
  2. Clear the site of any debris, rocks, or vegetation. Level the ground as much as possible using a shovel or rake.
  3. Install a solid and level foundation for your shed, such as concrete footings, concrete blocks, or treated wood skids. This will provide a stable base for your shed and ensure it is level and secure.
  4. Mark the location of the shed walls on the foundation, using stakes and string to create a guideline for the layout.

Step 2: Frame the Walls

Once the site is prepared, it's time to start framing the walls of your lean-to shed using green lumber. Follow these steps:

  1. Measure and cut the green lumber to the desired dimensions for your shed walls, making sure to account for the height, width, and length of the shed.
  2. Using a circular saw or miter saw, make straight and accurate cuts on the lumber pieces according to your measurements.
  3. Assemble the wall frames on the ground, laying out the lumber according to the wall layout guideline you created earlier. Make sure the corners are square and the frames are level.
  4. If desired, you can notch the ends of the lumber where they will intersect at the corners of the wall frames for added stability. Use a chisel to remove a small section of wood to create a snug fit.
  5. Attach the wall frames together using nails or screws, making sure to fasten them securely at the corners and along the edges.
  6. Once the wall frames are assembled and squared, lift them into position on the foundation and secure them in place using nails or screws.
  7. Repeat this process to frame all the walls of your lean-to shed, leaving an opening for the door and any windows you plan to install.

Step 3: Install the Roof

With the walls framed and in place, it's time to install the roof of your lean-to shed. Follow these steps:

  1. Measure and cut plywood sheets to the dimensions of the shed roof, leaving a slight overhang on the edges for water runoff.
  2. Place the plywood sheets on top of the wall frames, aligning them with the edges and corners of the shed.
  3. Secure the plywood sheets to the wall frames using nails or screws, spacing them evenly along the edges and field of the plywood.
  4. Cover the plywood roof with roofing shingles, starting at the bottom edge and working your way up. Follow the manufacturer's instructions for installation.
  5. Install any additional roofing components, such as drip edge, ridge vents, and flashing, to ensure a waterproof and weather-tight roof.

Step 4: Add Doors and Windows

Once the walls and roof are completed, you can add doors and windows to your lean-to shed to make it functional and accessible. Follow these steps:

  1. Measure and cut the openings for the doors and windows in the walls of the shed, making sure they are level and square.
  2. Install the door and window frames in the openings, securing them in place with nails or screws.
  3. Hang the door(s) in the door frame, making sure they are plumb and level. Install the door hardware, such as handles, locks, and hinges, according to the manufacturer's instructions.
  4. Install the window(s) in the window frame, securing them with screws or nails. Install any window hardware, such as locks or latches, as desired.
  5. Seal around the doors and windows with weatherstripping or caulk to prevent drafts and water infiltration
  6. Paint or stain the doors and windows to protect them from the elements and enhance the appearance of your shed.

Step 5: Finish the Interior

With the exterior of your lean-to shed complete, you can now focus on finishing the interior to create a functional and organized space. Follow these steps:

  1. Insulate the walls and roof of your shed to improve energy efficiency and create a more comfortable interior environment. You can use insulation batts, foam boards, or spray foam insulation, depending on your preference and budget.
  2. Install interior wall coverings, such as drywall, plywood, or paneling, to create a finished and clean look. Make sure to properly fasten the wall coverings to the wall frames using nails or screws.
  3. Paint or stain the interior walls and ceiling to protect them from moisture and add a personal touch to your shed's interior. Choose colors that complement the overall aesthetic of your shed.
  4. Install shelves, hooks, and other storage solutions to keep your tools, equipment, and other items organized and easily accessible. Consider adding a workbench or a pegboard for additional functionality.
  5. Install electrical outlets and lighting fixtures, if desired, to make your shed functional for various tasks, such as woodworking, gardening, or storage. Make sure to hire a licensed electrician if you're not experienced in electrical work.

Step 6: Add Finishing Touches

Finally, you can add some finishing touches to your lean-to shed to make it truly your own. Consider these ideas:

  1. Install gutters and downspouts to divert rainwater away from the shed's foundation and prevent water damage.
  2. Add trim and molding to the exterior and interior of your shed to enhance its appearance and create a polished look.
  3. Apply a weatherproof sealant or paint to the exterior of your shed to protect it from the elements and extend its lifespan.
  4. Add landscaping around your shed, such as flower beds, shrubs, or a gravel path, to beautify the area and create a welcoming entrance.
  5. Personalize your shed with decorative elements, such as a weathervane, window boxes, or a custom sign, to make it uniquely yours.

Conclusion

Congratulations! You've successfully built your own lean-to shed using green lumber and basic woodworking skills. With proper planning, preparation, and attention to detail, you can create a functional and attractive outdoor storage space that meets your specific needs. Remember to follow all local building codes and regulations, and consult with professionals if you're unsure about any aspect of the construction process. Enjoy the satisfaction of a job well done as you step back and admire your DIY lean-to shed, a practical and stylish addition to your property.

Saturday, April 8, 2023

DIY Lean-To Shed Step-by-Step Guide

DIY Lean-To Shed

Greetings fellow woodworkers! Are you in need of some extra storage space in your backyard? Look no further! In this article, we will guide you through the process of building your very own lean-to shed from scratch. Not only will you save money by doing it yourself, but you'll also have the satisfaction of creating a functional and attractive storage solution with your own hands. So grab your tools and let's get started!

Why Choose a Lean-To Shed?

Before we dive into the building process, let's talk about why a lean-to shed might be the perfect option for your storage needs. A lean-to shed is a simple, cost-effective structure that is attached to an existing building, such as your house or garage. It is designed to "lean" against the wall of the building, which provides extra stability and support.

One of the main advantages of a lean-to shed is its space-saving design. It doesn't take up much space in your yard, making it ideal for small or narrow areas. It's also a great option if you have limited woodworking experience, as it requires fewer materials and is easier to build compared to a freestanding shed.

Another benefit of a lean-to shed is that it can be customized to suit your specific storage needs. You can choose the size, shape, and layout of the shed to accommodate your tools, equipment, or other belongings. Plus, with a little creativity, you can add personal touches to make it aesthetically pleasing and unique.

Materials and Tools

Before you start building your lean-to shed, it's important to gather all the necessary materials and tools. Here's a list of what you'll need:

  • Lumber for framing and siding
  • Plywood for roof and walls
  • Nails or screws
  • Roofing shingles
  • Door and window (if desired)
  • Saw, hammer, drill, level, tape measure, and other basic woodworking tools

Make sure to choose high-quality materials that are suitable for outdoor use, as your shed will be exposed to the elements. It's also a good idea to have a detailed plan or blueprint to follow, which will help you stay organized and ensure that your shed turns out as you envisioned.

Step 1: Prepare the Site

The first step in building your lean-to shed is to prepare the site where it will be located. Choose a level area against the wall of your existing building and clear away any debris or vegetation. Make sure the ground is firm and stable, and consider adding a layer of gravel or compacted sand to create a solid foundation for your shed.

Next, measure and mark the dimensions of your shed on the ground, taking into account the height, width, and depth. Use a level and a tape measure to ensure that the markings are accurate and square. This will serve as a guide when you start framing the shed.

Step 2: Build the Frame

Once the site is prepared, it's time to start building the frame of your lean-to shed. The frame will provide the structure and support for the walls and roof of the shed. Here's how you can do it:

  1. Measure and cut the lumber according to your shed's dimensions. You will need four vertical posts for the corners and additional horizontal studs for the walls and roof.
  2. Attach the vertical posts to the wall of your existing building using screws or nails. Make sure they are plumb and level, and securely fastened to the wall. These posts will serve as the main support for your shed.
  3. Install the horizontal studs between the vertical posts to create the walls and roof of the shed. Use a level to ensure they are straight and level. You may need to cut notches in the studs to fit them around the vertical posts.
  4. Secure the studs to the vertical posts using nails or screws. Make sure the frame is sturdy and well-built, as it will provide the foundation for the rest of the shed's construction.

Step 3: Add the Walls and Roof

With the frame in place, it's time to add the walls and roof to your lean-to shed. This will provide protection from the elements and give your shed a finished look. Here's what you need to do:

  1. Cut the plywood sheets according to the measurements of your shed's walls and roof. Use a saw to make precise cuts.
  2. Attach the plywood sheets to the frame using nails or screws. Start with the walls, making sure they are flush with the edges of the frame. Leave openings for doors and windows if desired.
  3. Once the walls are in place, install the plywood sheets for the roof. Make sure they are properly aligned and overlapping to create a waterproof seal. You may need to cut and fit the plywood sheets to match the angle of your roof.
  4. Install roofing shingles on top of the plywood sheets to protect the roof from the weather. Follow the manufacturer's instructions for proper installation.
  5. If you want to add doors and windows, cut openings in the plywood walls and install them using hinges, locks, and weatherstripping.

Step 4: Finishing Touches

With the walls and roof in place, your lean-to shed is almost complete! Now it's time to add some finishing touches to make it functional and aesthetically pleasing. Here are some ideas:

  • Install shelves or hooks inside the shed to organize your tools and equipment.
  • Paint or stain the exterior of the shed to protect it from the elements and enhance its appearance.
  • Add a gutter system to collect rainwater and prevent water damage.
  • Install a skylight or windows to let natural light into the shed.
  • Add landscaping around the shed to enhance its curb appeal.

These finishing touches will not only make your shed more functional, but also add a personal touch and make it a visually appealing addition to your backyard.

Conclusion

Congratulations! You have successfully built your own lean-to shed from scratch. With some basic woodworking skills, the right materials, and a little patience.