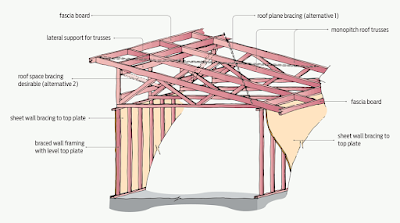
If you have an existing building or shed with a sloped roof, you may want to add a lean-to roof to provide additional space for storage or other purposes. Attaching a lean-to roof to an existing roof requires careful planning and proper installation to ensure a secure and watertight connection. Here are the steps to attach a lean-to roof to an existing roof:
Step 1: Plan and Measure
Before you start, plan out the design and dimensions of your lean-to roof. Measure the height, width, and length of the existing roof and determine the desired slope and size of the lean-to roof. Consider factors such as the location of doors, windows, and gutters on the existing roof, as well as local building codes and regulations. Create a detailed plan and obtain any necessary permits or approvals from local authorities.
Step 2: Gather Materials and Tools
Next, gather all the materials and tools you will need for the project. This may include lumber for the rafters and framing, roofing materials, fasteners, flashing, and waterproofing sealants. Make sure you have the right tools for the job, such as a saw, drill, level, tape measure, and safety gear.
Step 3: Prepare the Existing Roof
Before attaching the lean-to roof, you need to prepare the existing roof. Clean the area where the lean-to roof will connect to the existing roof, removing any debris, dirt, or old roofing materials. Inspect the existing roof for any damage or leaks and repair them as needed. Install a layer of waterproofing underlayment or flashing along the connection point to ensure a watertight seal.
Step 4: Install the Rafters and Framing
Next, install the rafters and framing for the lean-to roof. Use the measurements and design from your plan to cut the rafters to the desired length and angle to match the slope of the existing roof. Attach the rafters to the existing roof using metal brackets or framing connectors, following the manufacturer's instructions and local building codes. Make sure the rafters are level and securely fastened to the existing roof.
Step 5: Install the Roofing Material
Once the rafters and framing are in place, you can install the roofing material for the lean-to roof. Follow the manufacturer's instructions for the specific roofing material you are using, but in general, start from the bottom edge and work your way up, overlapping each row to ensure proper water shedding. Secure the roofing material with roofing nails or screws, following the recommended spacing and pattern. Make sure the roofing material is properly aligned and trimmed to fit around any openings or obstacles.
Step 6: Finish and Clean Up
Finally, finish up by installing any additional trim or accessories, such as fascia boards, gutters, or vents, according to your design and functional needs. Make sure all fasteners are properly secured and trim is aligned and level. Clean up the worksite by removing any debris, nails, or tools to ensure a safe and tidy finish.
Conclusion
Attaching a lean-to roof to an existing roof can provide additional space and functionality to your building or shed. However, it requires careful planning, precise measurements, and proper installation to ensure a secure and watertight connection. Follow the steps above, along with local building codes and manufacturer's instructions, to successfully attach a lean-to roof to an existing roof. With proper planning, preparation, and installation, you can create a functional and aesthetically pleasing lean-to roof that seamlessly integrates with your existing structure.
Summary
Attaching a lean-to roof to an existing roof requires careful planning, precise measurements, and proper installation. Follow these steps:
- Plan and measure the design and dimensions of the lean-to roof.
- Gather all materials and tools needed for the project.
- Prepare the existing roof by cleaning the area and installing waterproofing underlayment or flashing.
- Install the rafters and framing, ensuring they are level and securely fastened to the existing roof.
- Install the roofing material, following the manufacturer's instructions and overlapping rows for proper water shedding.
- Finish up by installing any additional trim or accessories, and clean up the worksite.
By following these steps, along with local building codes and regulations, you can successfully attach a lean-to roof to an existing roof and create a functional and attractive addition to your building or shed.
Remember to always prioritize safety and take necessary precautions throughout the entire process. If you are unsure about any step or aspect of the project, consult with a professional or seek assistance from an experienced woodworker. With proper planning and execution, you can achieve a successful outcome and enjoy the benefits of a well-attached lean-to roof for years to come.


